In this Project, we want to control servo motor potitions from analog sensor ( potentiometer or flex sensor ).
The Hardware

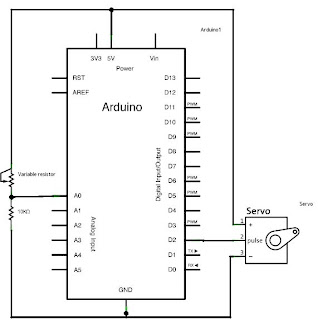


As shown at picture, connect analog input to Arduino analog pin 0. don't forget about 10K resistor. Connect an Servo motor ( yellow wire ) to Arduino Digital pin 2 and then connect the red and black wires go to +5V and ground, respectively. Refer to the picture and scheme to do this.
The Program
Here we will use 2 method to control an servo motor.
1. Pulse Method
This method is more complex and exposes the math and timing required to control a servo with a microcontroller.
/*
  Servo control from an analog input

 The minimum (minPulse) and maxiumum (maxPulse) values
 will be different depending on your specific servo motor.
 Ideally, it should be between 1 and 2 milliseconds, but in practice,
 0.5 - 2.5 milliseconds works well for me.
 Try different values to see what numbers are best for you.

 This program uses the millis() function to keep track of when the servo was
 last pulsed.  millis() produces an overflow error (i.e. generates a number
 that's too big to fit in a long variable) after about 5 days. if you're
 making a program that has to run for more than 5 days, you may need to
 account for this.

 by Tom Igoe
 additions by Carlyn Maw & Rob Faludi
 Created 28 Jan. 2006
 Updated 10 Jun. 2008
 */

 int servoPin = 2;     // Control pin for servo motor
 int minPulse = 500;   // Minimum servo position
 int maxPulse = 2500;  // Maximum servo position
 int pulse = 0;        // Amount to pulse the servo

 long lastPulse = 0;    // the time in milliseconds of the last pulse
 int refreshTime = 20; // the time needed in between pulses

 int analogValue = 0;  // the value returned from the analog sensor
 int analogPin = 0;    // the analog pin that the sensor's on

 void setup() {
  pinMode(servoPin, OUTPUT);  // Set servo pin as an output pin
  pulse = minPulse;           // Set the motor position value to the minimum
  Serial.begin(9600);
 }

 void loop() {
  analogValue = analogRead(analogPin);      // read the analog input
  pulse = map(analogValue,0,1023,minPulse,maxPulse);// convert the analog value
                                                    // to a range between minPulse
                                                    // and maxPulse.
  // pulse the servo again if rhe refresh time (20 ms) have passed:
  if (millis() - lastPulse >= refreshTime) {
    digitalWrite(servoPin, HIGH);   // Turn the motor on
    delayMicroseconds(pulse);       // Length of the pulse sets the motor position
    digitalWrite(servoPin, LOW);    // Turn the motor off
    lastPulse = millis();           // save the time of the last pulse
  }
 }
This code was written with a potentiometer in mind, so it assumes you're going to get values from 0 to 1023 from the sensor. If you don't, the servo won't move through its whole range. Determine the range of numbers the sensor is giving you and adjust the servo formula to fit. To fix this, use the map() function. You know the input range is the range of the sensor, 0 to 1023. And you know the output range is from minPulse to maxPulse. So do this:
 pulseWidth = map(analogValue, 0, 1023, minPulse, maxPulse);
2. Using the Arduino Servo LibraryThe second example shows you how to control a servo motor using the Arduino Servo library. This library is very easy to use and is much easier to follow. However, it obscures all the calculations and handles the dirty work for you. This is useful once you've attempted the pulse method and understand it completely.
/*
 Servo control from an analog input using the Arduino Servo library
 This example code uses the Arduino Servo library which comes packaged with the Ar duino software.
 In order to make this work, you must include the Servo.h library file, create an  instance of the Servo object.
 attach a pin to the Servo object, and then write an analog value to the Servo obj ect to set its position.
 The difference between using the Servo library and the older method of pulsing a  digital pin is that the library
 handles a lot of the work for you. You no longer need to figure out the translati on between pulse length and position.
 You now can simply specify the angle you'd like your servo to be at and it will t urn to that position.

 Updated 08 Sep 2009
 by Rory Nugent
 Created 20 Jan 2009
 by Tom Igoe
 */

 #include <Servo.h>      // include the servo library
 Servo servoMotor;       // creates an instance of the servo object to control a servo
 int analogPin = 0;      // the analog pin that the sensor is on
 int analogValue = 0;    // the value returned from the analog sensor
 int servoPin = 2;       // Control pin for servo motor. As of Arduino 0017, can be any pin
 void setup() {
   servoMotor.attach(servoPin);  // attaches the servo on pin 2 to the servo object
 }
 void loop()
 {
   analogValue = analogRead(analogPin);             // read the analog input (value between 0 and 1023)
   analogValue = map(analogValue, 0, 1023, 0, 179); // map the analog value (0 - 1023) to the angle of the servo (0 - 179)
   servoMotor.write(analogValue);                   // write the new mapped analog value to set the position of the servo
   delay(15);                                       // waits for the servo to get there
 }
No comments:
Post a Comment